
Latest Post
Showing posts with label Android Tricks. Show all posts
Showing posts with label Android Tricks. Show all posts
Stop Those Annoying Browser Prompt Asking For Your Location or to Send Notifications
Written By Micah on Tuesday, January 30, 2018 | 3:17 PM
If you've grown tired of answering those annoying browser prompts
every time a website wants to show you notifications or know your
location, you can turn the messages off forever with a few clicks in
every major browser. Scroll down below for your browser and where to
locate the appropriate settings in Chrome (desktop and Android), Firefox,
Opera, Edge, Internet Explorer and Safari (desktop and iOS).
Chrome
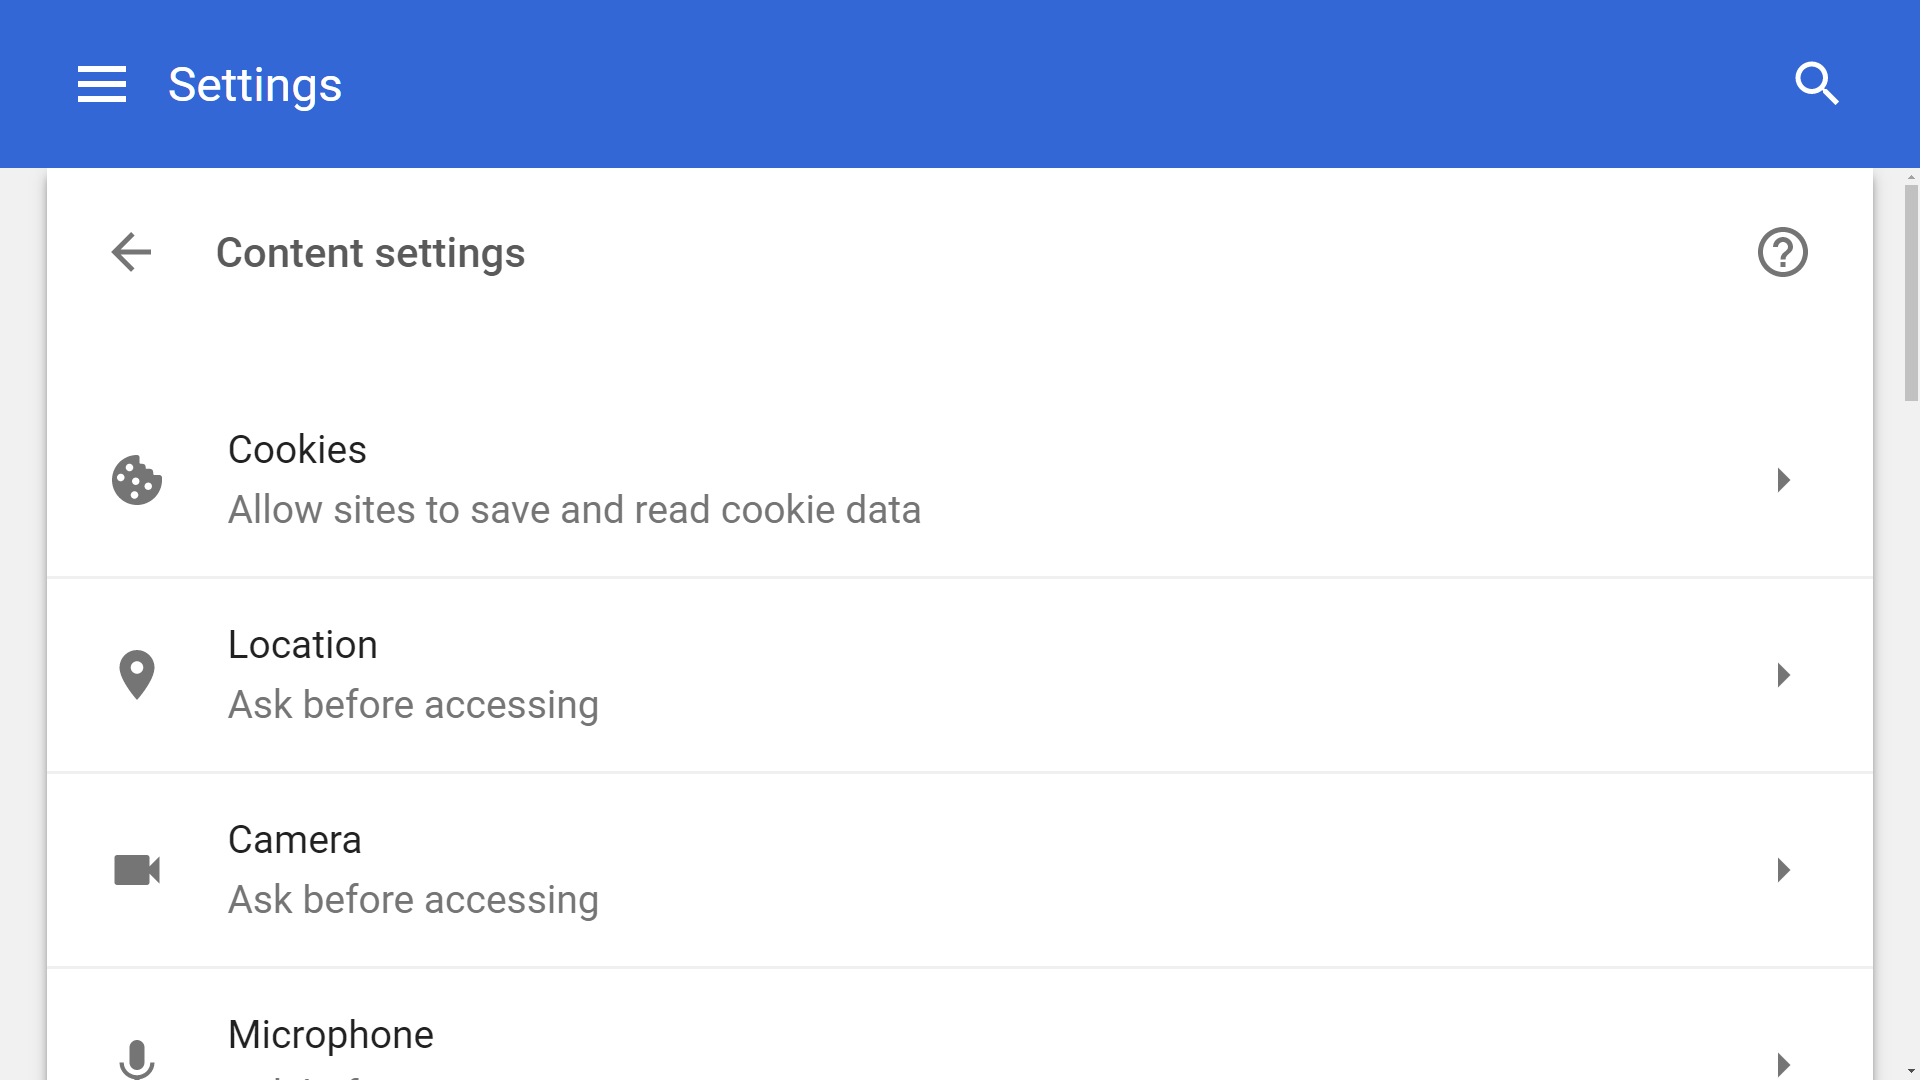
From the dropdown menu, select Settings > Advanced (scroll down) > Content settings.
From Chrome's content settings you can click into 'Location' and
'Notifications' separately to disable each. This will block the pop-ups
forever while also preventing websites from knowing your location and
sending you notifications.
Chrome (Android)
The exact same settings exist on the mobile version of Chrome found
in Android devices. Although we wouldn't outright disable location
settings on the browser like we'd do on the desktop (for obvious useful
reasons), if one of your favorite websites annoys you with these kind of
prompts, you can always disable them on a per-site basis.
From the Chrome menu button on the top right corner, select Settings.
Under Settings, scroll down to Advanced > Site settings. There you
will find discrete settings for both Location and Notifications, the
default is set to "Ask first," you can set those to "Block" which will
stop sites to prompt you for either.
Firefox
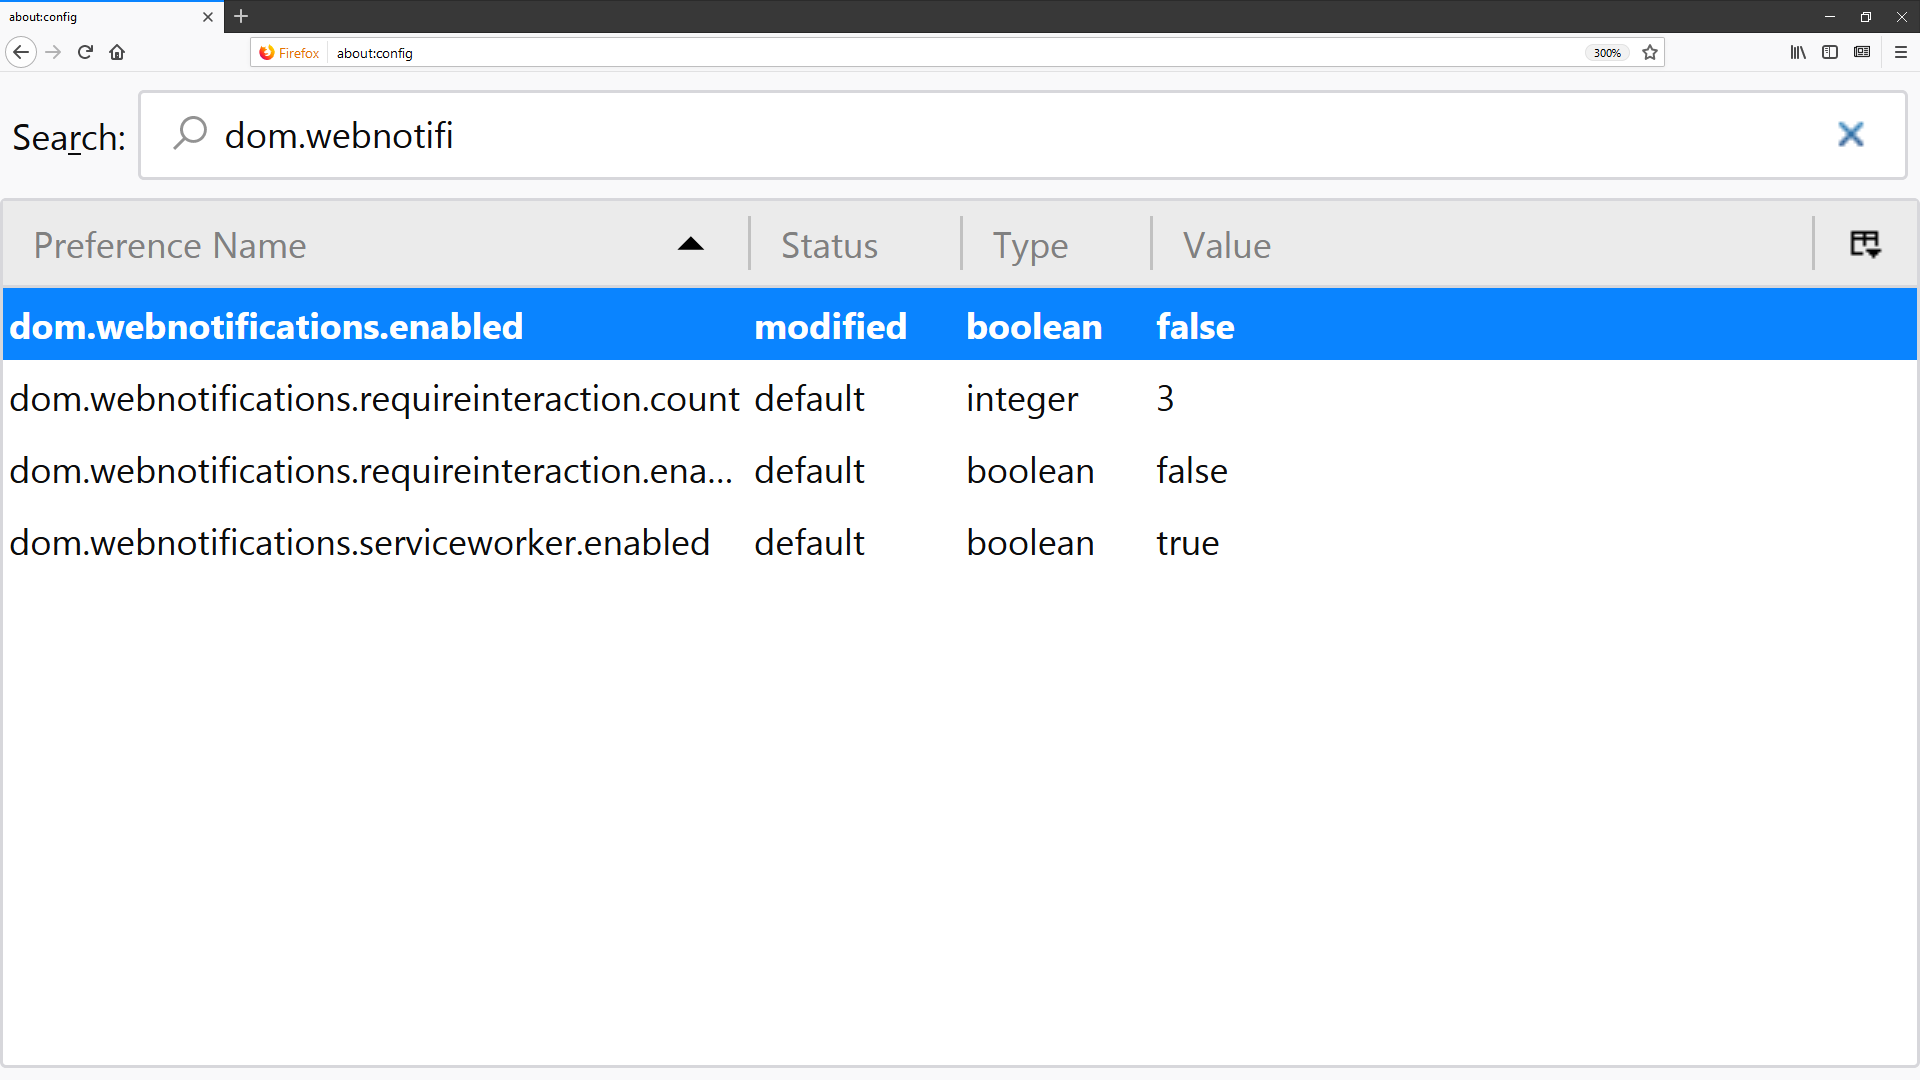
In the address bar type "about:config" and hit Enter. Accept the risk when prompted.
If you made it under the hood safely, use the search bar to find the following entries: dom.webnotifications.enabled and geo.enabled.
Double-clicking on each entry will set their values to false, which
is what you want to do if you're trying to disable the pop-ups.
Opera
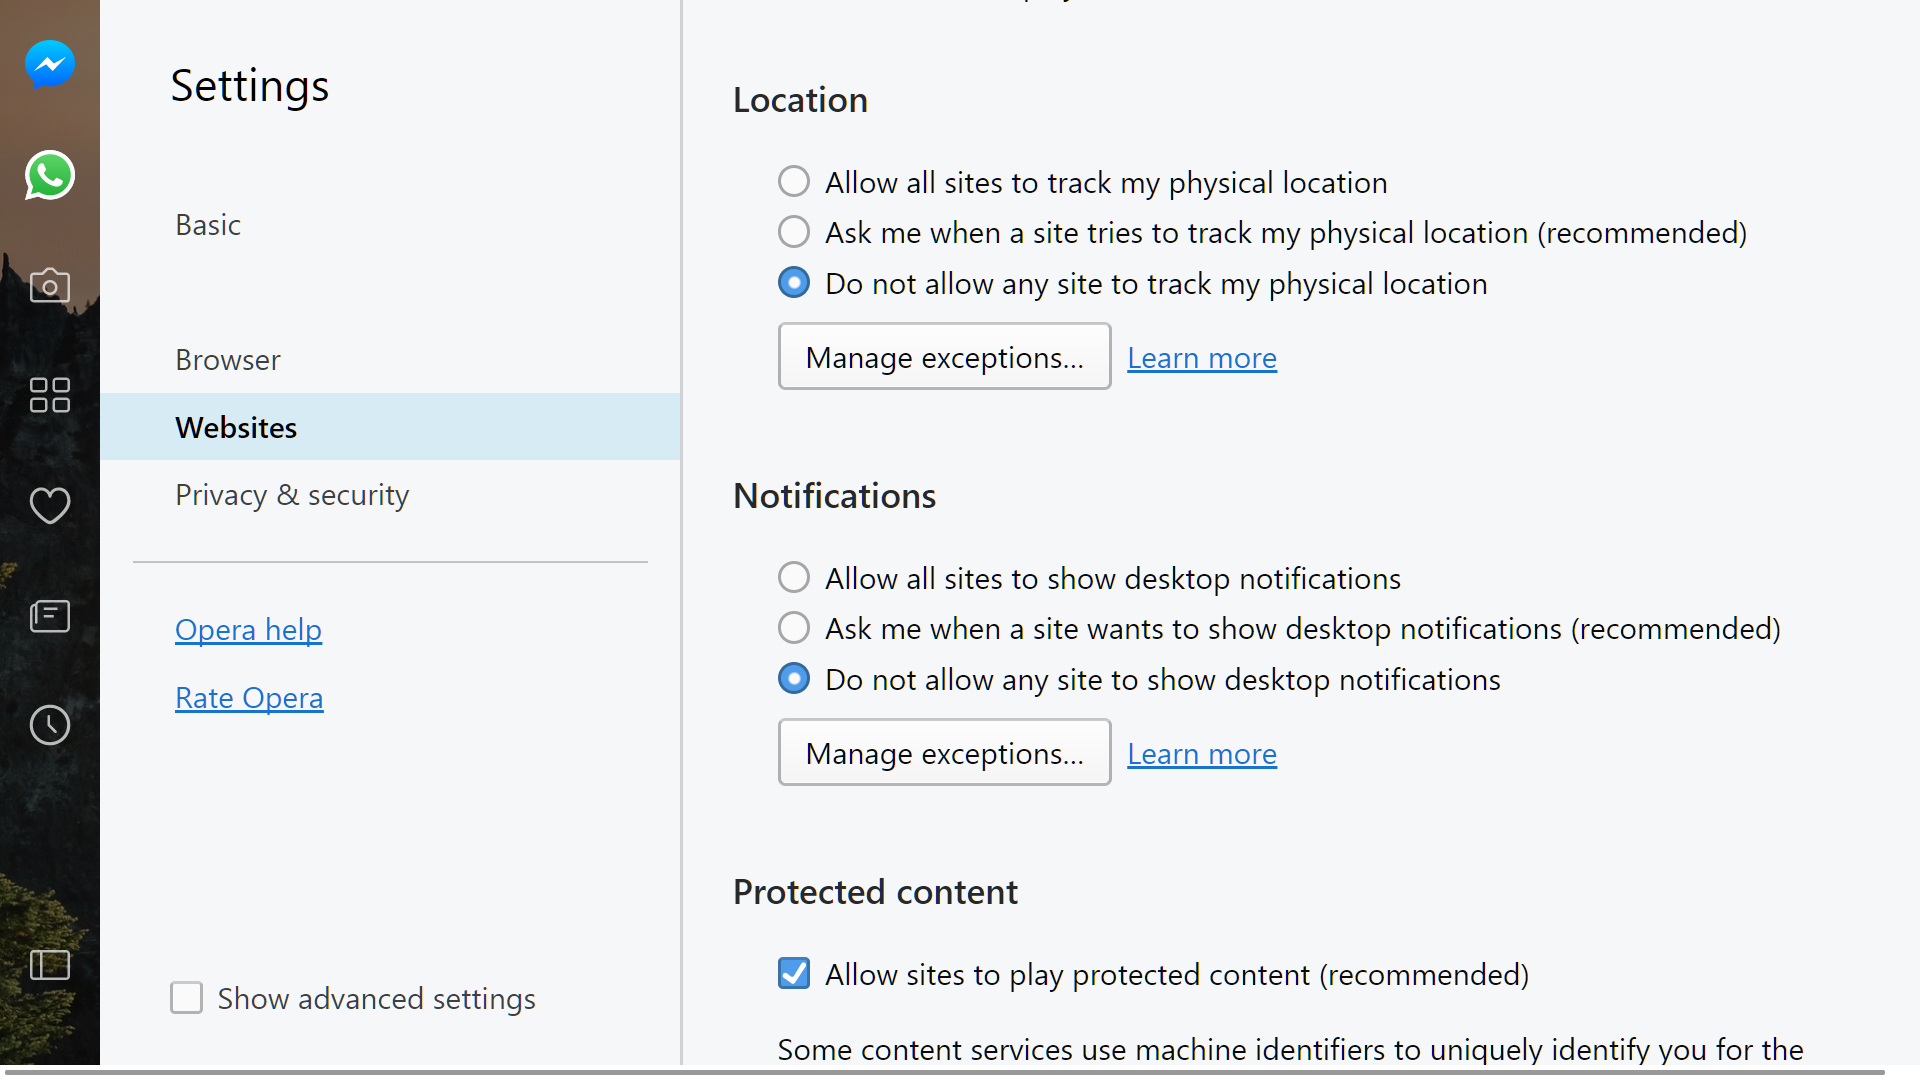
From the drop down menu, select Settings and then go to the Websites tab.
Location and notification prompts are both listed halfway through the
website section of Opera's menu settings -- set both of them to "do not
allow...".
Microsoft Edge
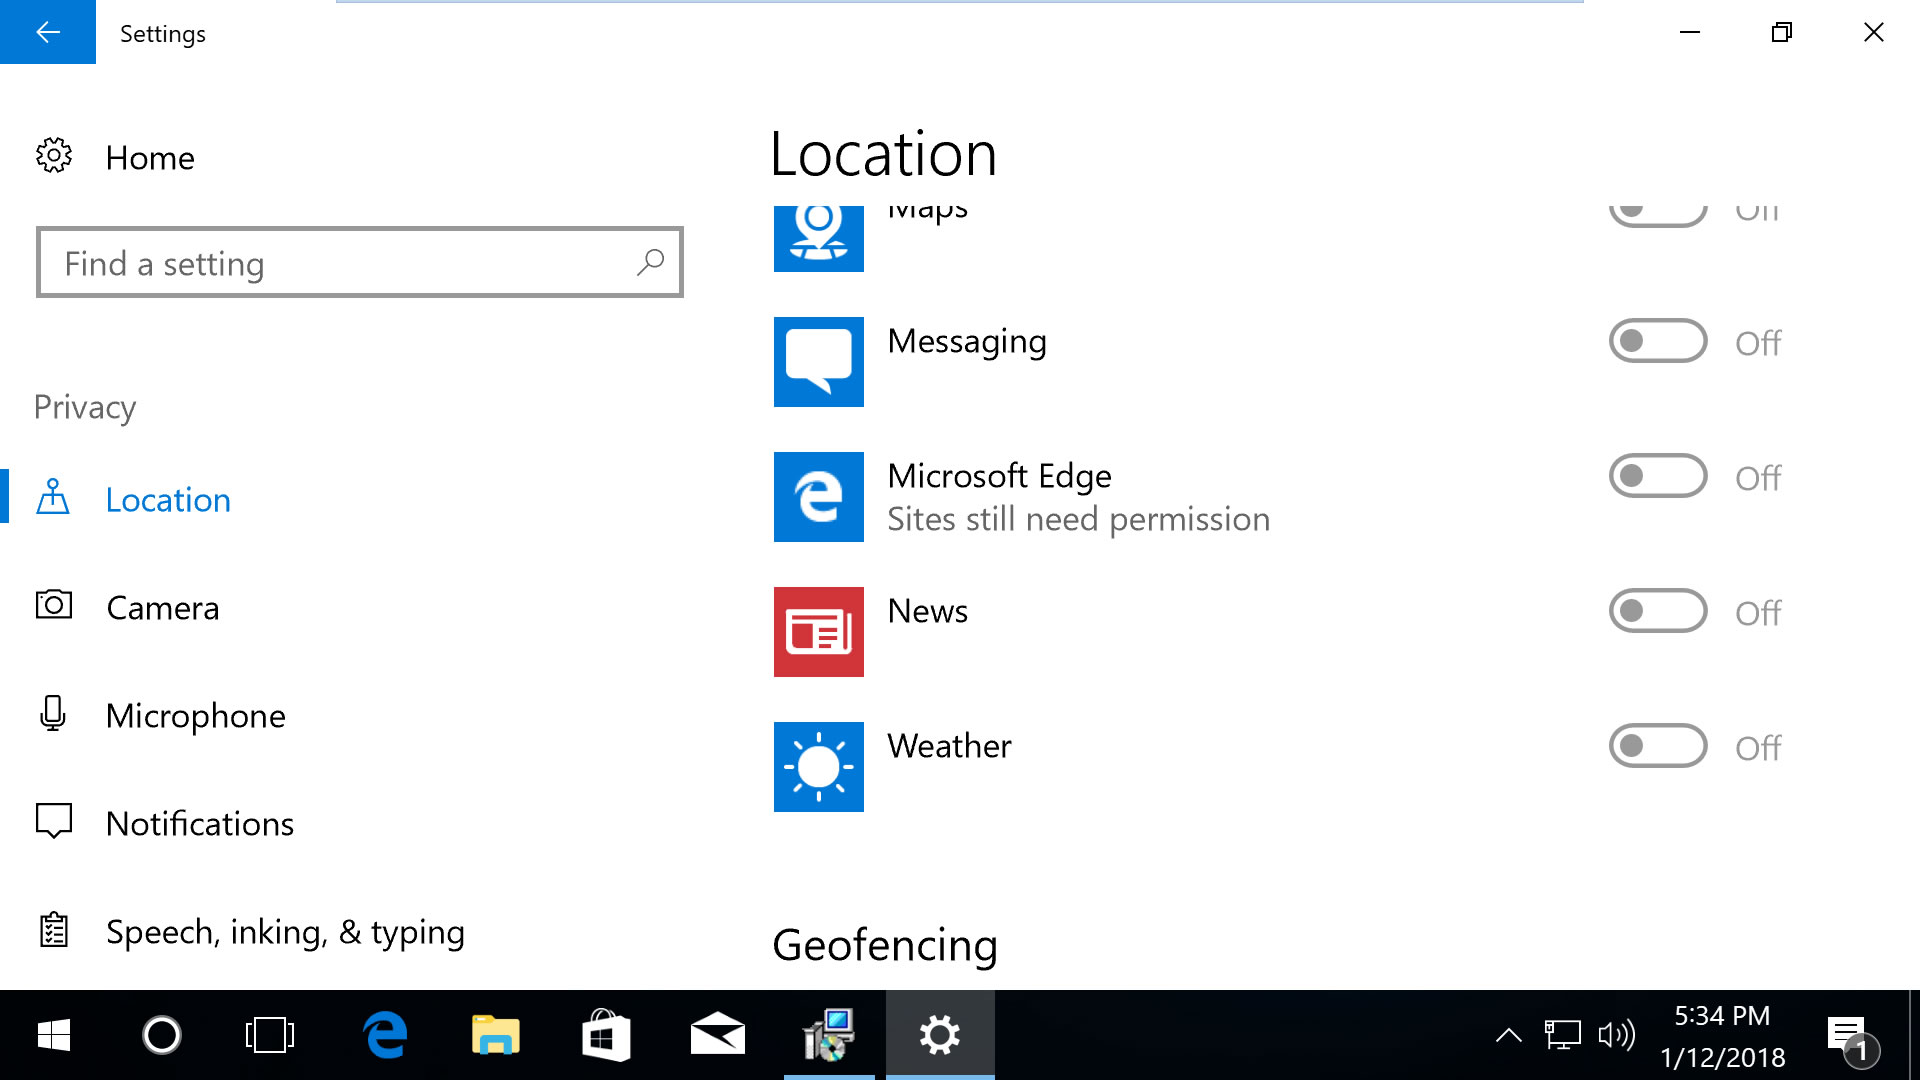
Scroll down in this section to 'Choose apps that can use your
location' and you can customize the settings for Microsoft Edge along
with other applications. Note that disabling 'Location service' on the
top of the same page will block all apps from using your location.
Open Edge's settings menu, go to View advanced settings > Notifications (manage).
Websites that can show notifications will be listed here so you can
customize which ones are able to send them. Likewise, from the privacy
settings in the Windows 10 menu mentioned above, the notifications
section will let you block them from all applications.
Internet Explorer
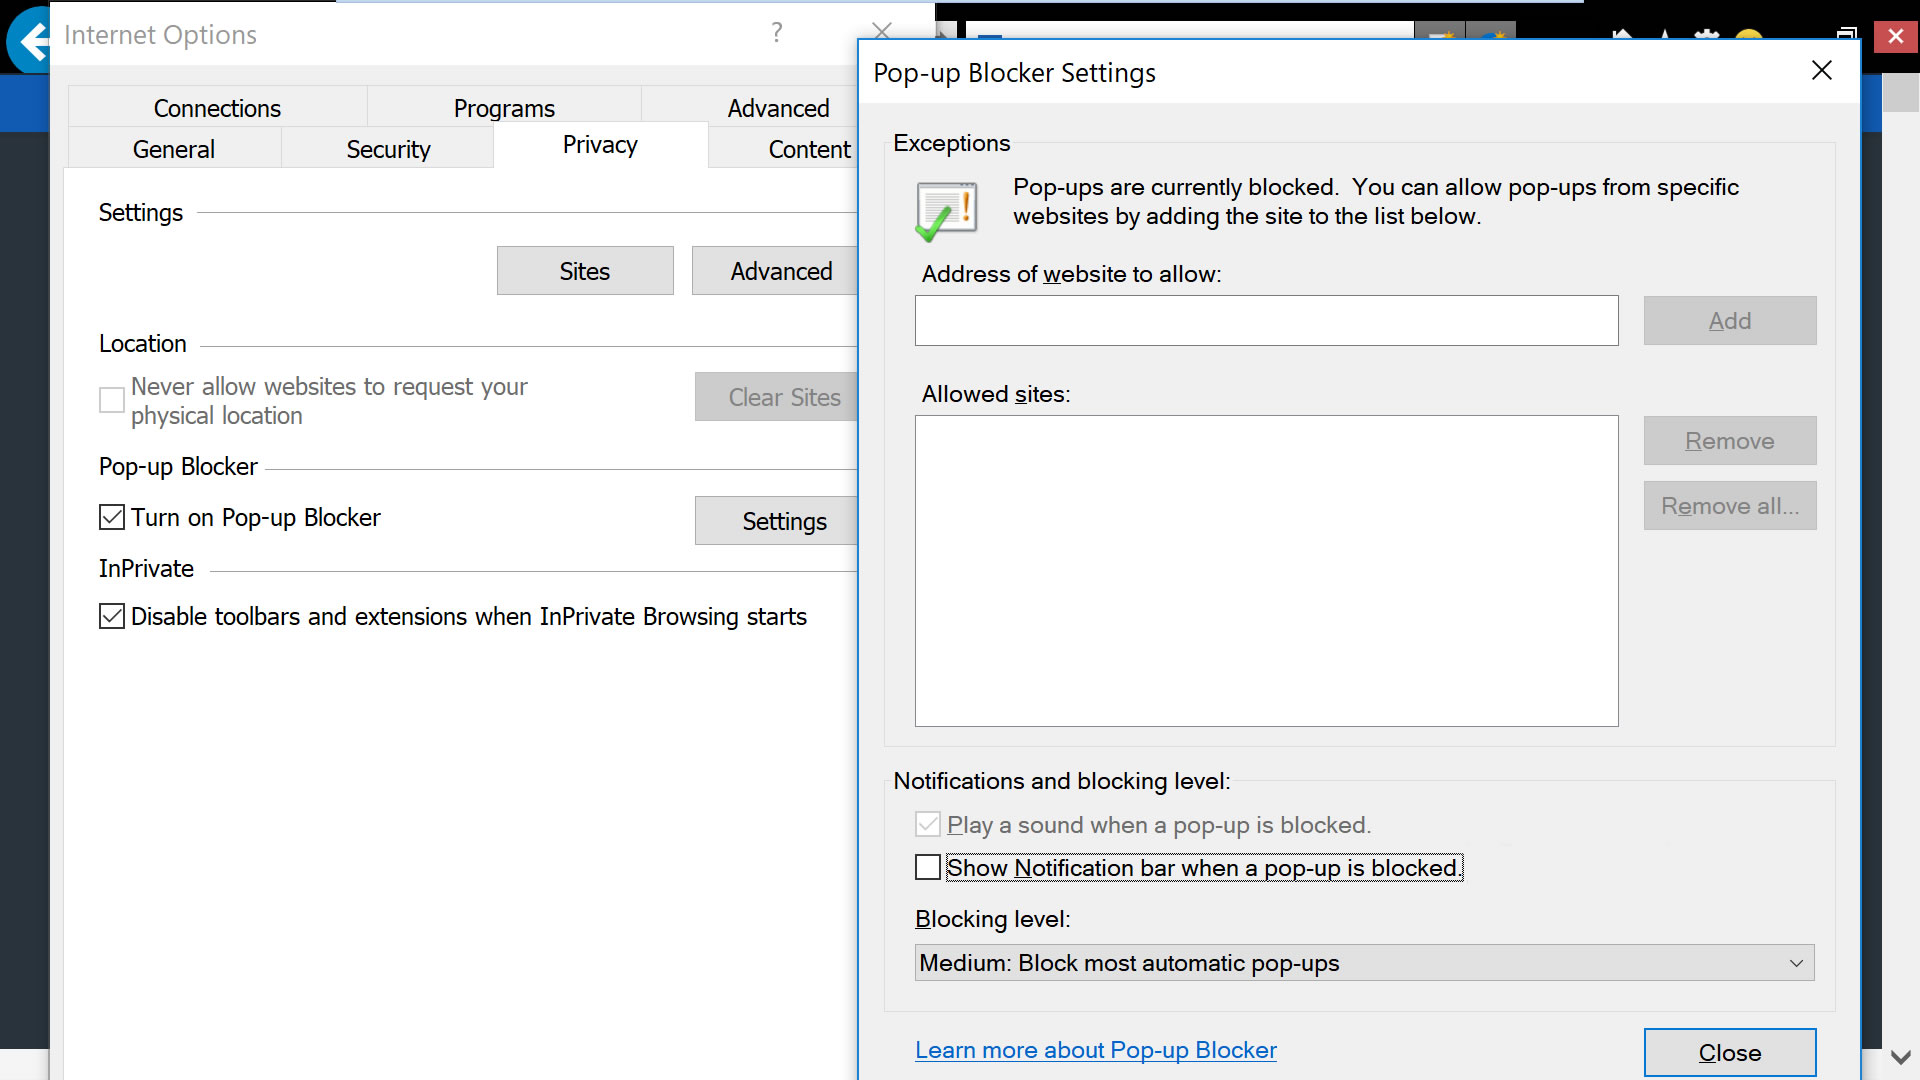
Open IE's dropdown menu, go to Internet options, select the Privacy tab.
In the privacy tab, uncheck 'never allow websites to request your
physical location' and then click into "Settings" for the option to
uncheck notifications from when a pop-up is blocked (this isn't the same
as the notifications blocked in other browsers but nonetheless
noteworthy).
Safari (macOS)

From Safari's drop down menu, select Preferences then go to the
Websites tab. On the left side menu you'll find Location and
Notifications.
On Location, you will find per website settings based on the
currently opened tabs. But to deny location to all websites, on the
bottom right corner select where it says "When visiting other websites:"
select Deny.
On the Notifications settings, uncheck the option where it says
"Allow websites to ask for permission to send push notifications."
Safari (iPhone /iOS)
On iOS devices, location settings are more strictly managed by the
operating system. Go to Settings > Privacy > Location Services.
Find the setting for Safari Websites and set it to "Never."
- techspot
7 Android Settings You Should Change Right Now
Android comes with a lot of features, but not all of them are enabled
out of the box. With the ever-growing feature set, it’s easy to miss
those deeply buried Android settings that can enhance your experience.
Whether
you are looking to fine-tune your privacy and security or boost
performance, here are some changes you should make in the Android
settings menu.
1. Hide Sensitive Content From Lock Screen
Since
Android 5.0 Lollipop, you can interact with the notifications directly
from the lock screen. While this is convenient, it also means that
anybody can go through your notifications — even when your phone is
locked.

Fortunately, there’s an option to hide sensitive notifications on the lock screen.
First, you need to secure your Android phone with a password, pattern, or a PIN. Once you do, here’s how to hide sensitive notification content.
- Open Settings > Notifications.
- Tap the cog icon on the upper-right of the screen.
- Tap On the lock screen.
- Select Hide sensitive notification content.
Sensitive notifications will show “content hidden” instead of
displaying the actual message. You’ll need to unlock your device to view
the message.
If you would like to hide sensitive notifications on a per-app basis, select Show all notification content.
Hit back and you should find a list of installed apps. Tap on the app
you’d like to hide sensitive notifications from, then tap On the lock screen > Hide sensitive notification content.
2. Opt Out of Personalized Ads
There’s a shocking number of things that Google knows about you.
Its huge tracking system is the reason why you see such precisely
tailored ads. For instance, if you search on your desktop about noise-canceling earphones, you might quickly start seeing ads for them around the web.
If you’re paranoid about your privacy, there’s an easy way to turn it off.

- Open Settings.
- Navigate to Google > Ads.
- Enable Opt out of Ads Personalization.
Note that while you’ll still see ads in ad-supported Android apps, they’ll not be based on your interests.
3. Enable Auto-Lock and Power Button Instant Lock
By default, your Android phone’s screen turns off automatically after a set period of inactivity to save battery.
But the lock screen only kicks-in a few seconds later. Mischievous
people can potentially access your unlocked device if you leave it
unattended during this period.
It’s recommended to lower your screen timeout. To do so, head over to Settings > Display > Sleep. Select the lowest acceptable number of seconds after which your screen would turn off.

Once you’ve lowered the screen timeout, it’s time to force the lock screen to kick in as soon as the screen is turned off.
- To do so, navigate to Settings > Security > Automatically lock.
- Select Immediately.
- On the same page, enable Power button instantly locks.
Note that this setting might be located elsewhere depending on your Android manufacturer. An easy way to find the appropriate setting on any custom Android skin is using the search option in the settings.
4. Disable Doze Mode for Specific Apps
Introduced in
Marshmallow, Doze is a nifty feature that helps you save battery on your
Android device. The basic idea is that your apps “sleep” while your
phone is off, preventing them from running amok in your absence.

While this works great for most apps, you might get delayed notifications from your favorite messaging apps. Also, you might experience issues with VPN apps as they need to run constantly in the background. In such cases, Doze mode can do more harm than good. Fortunately, Android lets you disable Doze mode on a per-app basis.
- To do so, open Settings > Battery.
- Tap the three-dot overflow menu button.
- Select Doze and app hibernation.
- Tap the app you would like to exclude and select Don’t optimize.
Note that you should create exceptions only for the apps that really need it, otherwise they can cause a major battery drain.
5. Enable Persistent Number Row in Gboard
If
your job involves dealing with numbers, it can be cumbersome to toggle
your keyboard between the number and the alphabet mode.
If you use
Gboard, which I guess most of you do, you can enable a persistent
number row at the top of your keyboard. It’s a great way to utilize the
growing screen real estate on mobile devices.

- To do so, open Gboard.
- Hold the emoji/cog icon and tap on Gboard keyboard settings.
- Tap Preferences.
- Enable Number row.
You should see a persistent number row at the top of your keyboard. This can help you substantially increase your typing speed.
6. Enable Instant Apps
Instant Apps
are a pretty innovative idea: you can check out Android apps without
having to install them, thus saving time and data. It started out as an Android Oreo-exclusive feature, but Google started rolling it out to devices running Lollipop or later a couple of months ago.
Instant Apps are disabled by default, but enabling them is just a flip away.
- Open Settings > Google.
- Enable Instant Apps.
- Tap Yes, I’m in to confirm.

Once
you enable it, simply search for the app on the Play Store. The Play
Store listing supports just 5 apps for now: BuzzFeed, NYTimes, RedBull
TV, OneFottball, and ShareTheMeal. To try an Instant App, tap Try Now besides the Install button.
To search for other Instant Apps, search for the apps from your mobile browser.
7. Move Chrome’s Address Bar to the Bottom
Reaching
the top of the screen, especially with just one hand, can be quite a
pain. Chrome’s address bar is placed at the upper-half of the screen,
making it harder to reach on larger-sized phones.
Thankfully, there’s a quick way to move Chrome’s address bar to the bottom for easier access.

- Type chrome://flags in Chrome’s address bar and hit Enter.
- Find Chrome Home and enable it.
- Tap Relaunch Chrome.
- Tap the Recent button to open up the multitasking screen. Swipe away Chrome to force close it.
- Re-open Chrome.
You may need to restart Chrome a couple of times to make it work. It’s kind of weird, but this is how it works for now.
That’s it! The address bar should be moved to the bottom, thus making it more accessible than ever.
Make the Most of Your Android Phone
Tweaking these settings
will help you get the most of your Android device, without dramatically
changing the way you use your favorite operating system. Whether you’re
looking to protect your privacy or enhance your everyday Android
experience, a few tweaks are all you need.
Which of the
above settings have you changed on your Android phone? Do you know of
any other settings that can help you level up your Android experience?
Share your thoughts with us in the comments below.
- makeuseof
How to Get back Deleted Whatsapp Messages
Written By Micah on Sunday, November 23, 2014 | 8:32 PM

We All are Aware of Messaging app Called Whatsapp, We Use it daily and no doubt We Love it, But have you been in a Situation when you accidentally delete an important message on Whatsapp and you don’t know what to do next? Well Touch screen devices are great to use but many a times it frustrates you,when you tap on wrong option and things happens which you don’t wished to do.
Many of you might not know that there are ways to Get back Deleted Whatsapp Messages. Today in this article i will share two Methods to Get back Deleted Whatsapp Messages on your Android phone.
1) Manually
2) Using Web Application
Get back Deleted Whatsapp Messages-Manually
Only Few Knows that Whatsapp Creates backup of all the data each day at 4 am (system time) Which is Stored in the SD card of your Android Smartphone. Follow the below simple steps and i will show you to Get back Deleted Whatsapp Messages.
Step 1) First of all Navigate to the Whatsapp database folder, you will require file explorer for this task. the path is > sdcard/WhatsApp/Databases.
Step 2) In the Database folder you will see Chat files which are with names similar like msgstore-2014-01-04.1.db.crypt. You may notices the file names have dates as well. but there is a File which is msgstore.db.crypt, we need to rename it. you can add any word before msgstore.db.crypt.
Step 3) After renaming that file, From the other Files just select the file which shows appropriate date before you accidently deleted your whatsapp messages, and then rename that file tomsgstore.db.crypt. This Renaming process can also be done on your PC by Connecting your device.
Step 4) Now the Final step, Goto Setting>Applications>manage applications>Whatsapp and Click on Clear Data. Now open Whatsapp, Choose Restore when it prompts. Thats it, the chat file saved as msgstore.db.crypt will be restored and hence your messages too.

On Reaching here, you Need to Click on Restore instead of No Thanks.
Bonus: In Case if you have deleted any Image or Audio or Video from your whatsapp chat, then do not worry, its not deleted forever untill you delete it. To view that image or Video all you have to do is with the help of your Preferred file Manager, Navigate to sdcard/WhatsApp/Media Where you will find folders with names Whatsapp Audio, Whatsapp images, Whatsapp video, Open them up to find the file you are looking for.
Get back Deleted Whatsapp Messages- Using Web App
In this Method we are Going to use a Web Application Called Recover Messages which is Specially Designed to Get back Deleted Whatsapp Messages. This is a Free Online Services which will help you to Read the Content of the database file and shows you Sent and Recieved messages.
Simply Go to Recover messages Site, Click on Select SQlite file to Upload the Database file, Select the Database file from SD card , Check the box which says i accept the terms of use and click on Scan.

Just wait for few seconds while it takes a bit of time to show you the Messages. With this Simple Method you can View your deleted Whatsapp messages within less than a minute.
The only drawback is You can only extract and View/Read your deleted messages but you can not restore them to your whatsapp chat history.
So in this article we saw two methods to Get back Deleted Whatsapp Messages, i hope it helps you now or in future. Don’t forget to share it on Social media if you liked it and You may subscribe for the free Daily Updates directly to your e-mail inbox, Using Below Subscription box.
via:- http://www.smarttricks.net/
Fix There is a Problem Parsing the Package Error
Android is the most popular Mobile Operating System today.

The reason is because of its Versatility, User Friendly and Easy to Use for all Users.
There is not Doubt that Most People Prefer Android ahead of other Mobile Operating System.
But this Doesn’t Mean you will never Face any Problem or Error while using Android Smartphones.
We all like to Install Different apps or Games in our android smartphones but Sometimes while installing you my be Displayed an Error which says “There is a Problem Parsing the Package”
So if you face this kind of error while Installing any App or Game in your Android smartphone and want to get rid of it, then Do not worry because here in this article i am going to discuss About this error, The Reason and How to Fix it Etc.
Reasons of There is a Problem Parsing the Package Error
You may get this Error Due to following Reasons:

- The Downloaded .apk file is Currupted or not fully downloaded
- You might have turned off “Allow installation of apps from Unknown Sources”
- If the App is not Compatible with the Hardware or the Version of OS you are using.
How to Fix There is a Problem Parsing the Package Error
So Now that we know why There is a Problem Parsing the Package error occurs, we can now easily find a fix to this Problem.
1. Allowing Installation from Unknown Sources:
We tend to download .APK files from Google Play store but sometimes We even download it from unknown sources and hence android don’t Allow us to install the app.
One of the most Common fix to this problem is to Turn on “Allow installation of apps from unknown Sources”. To do so Follow the Below Simple steps
- Go to your Device Setting Menu
- Scroll down and Click on Applications
- Now Check the Box of Unknown Sources to allow installation of non Market Applications
After Completing the Above Simple steps you may now try and install the app which was showing error.
2.Inspect Your APK File:
If the Above Fix do not work to fix the error then you may now try to inspect the apk file that you downloaded. Check it the file is Fully downloaded and is not Corrupted.
If you have downloaded the apk file from any other place rather then Google play store then Make sure you download it from Google play store this time. Try to install it Now.
3.App is not Compatible with your Device or OS:
If you are still not able to Get rid of There is a Problem Parsing the Package Error then it clearly indicates that the file that you have downloaded is not Compatible with your Device hardware or Operating System.
Try to Install it on another Android Device which has better hardware and Higher Version of Android Installed in it.
So these were Some of the Fixes that will help you to Tackle with the There is a Problem Parsing the Package Error Message.
via: http://www.smarttricks.net/
Transfer Files between PC and Android wirelessly

Do you transfer files by connecting your mobile phone to PC with the help of USB, thus connecting and disconnecting USB gives you trouble, so turn into wireless, thus reducing your tension of wire. The benefit of wireless is that it is easy to connect and there is fast transfer of files. Here are the few wireless apps which have highest reviews in Google Play store and that will help you to Transfer Files between PC and Android wirelessly
Apps to Transfer Files between PC and Android
Airdroid is an top app to Transfer Files between PC and Android. It is available at that size of 6.4 MB and requires Android 2.1 or up. It has the highest rating for wireless data transfer. It is easy to use and even looks much pretty. The Key feature supported by this app is that— desktop SMS service, wireless transfer of files and media data, phone locating technique app management, camera and screenshots.
Its size varies with devices. It is commonly known as an Android File Manager app but can also be used to transfer files wirelessly, select “Remote Manager” under the “Fast Access” list, you can find local network you are connecting to. Tap “Turn on”, find the given ftp address, then input the ftp address in the address bar of computer on your pc. As long as you get used to this app you will find it more than easy to use it.
It is available at the size of 2.8 MB and requires android 2.0 or up. It is not as easy to use. The first time you run this app, you are required to set service port and password for your connection. Tap “start server” an IP address is generated for your device, input The IP address and password on computer browser, there will be a page displayed which looks similar to desktop.
3CXDroid also supports USB mode, Desktop SMS, Gallery Viewer, Media Player, FTP Server, WiFi Keyboard, Webcam, Screen Capture, Contact Manager, Remote Call, Wallpaper Utils, APK Web Installer, Terminal Emulator, Logcat, etc.
Conclusion :
With the help of such apps our work gets easier and better, and we don’t need the maximum use of USB or any other wiring, which make these apps unique and is greatly appreciated by the users. So what are you waiting for, don’t be in old fashion of wiring stuff just download the apps and enjoy life more easy.
via:- http://www.smarttricks.net/
How to make money with Android apps
Written By Micah on Saturday, November 22, 2014 | 7:36 PM
When you look at your phone, you probably think about spending money rather than making it. Your handset almost certainly cost you a pretty penny, be it in up-front costs or in the form of an on-going contract. There are also the apps you purchase to consider, but and there's no reason that it shouldn't earn you a little money and pay its way. Thankfully there are plenty of apps to be found in Google Play that you can use to earn money or credit. Getting paid to use your Android device – perfect! Here's how to make money with Android apps

Google Opinion Rewards
It perhaps comes as little surprise that Google has an app of its own that you can use to make money. With Google Opinion Rewards you earn Google Play credit by completing surveys. You'll receive a notification whenever a new survey is available, and you just need to spend a few moments answering a series of questions – there's nothing too taxing! Once completed, survey earn you credit that can be used in Goole Play to buy apps, music and other things. It's worth noting that many of the surveys have a deadline for completion, so make sure you don’t wait too long to complete them.


MintCoins
Rather than store credit, MintCoins gives you the opportunity to earn yourself cold, hard cash. It's an app that helps you to earn money in a number of ways. You can gain virtual coins by downloading free apps, by watching videos, registering with websites, and referring your friends to do the same. There are also surveys to complete, and as soon as your balance hits $1, you're free to withdraw your earnings to a PayPal account – or you can wait and let it build up for longer if you like.


iPoll
Google Opinion Rewards is not the only survey-based app that can be used to pull in a little cash. iPoll works in a very similar way providing you with a series of "missions" to complete. While some of these are dependent on your location, others can be completed by anyone, anywhere. In addition to traditional surveys, you may also be asked to submit photos or even upload an audio or video recording. Many of the missions have a decent amount of money associated with then, and when you want to withdraw your earnings, you have a few options. As in other apps you can pull the money into a PayPal account, but your can also add it to your Amazon or iTunes account if you prefer.


Earn Money
The name says it all here – this is an app designed to help you to earn money. If you try out the other apps mentioned here, this one might look familiar. It is all but identical to MintCoins, but you might find that the number of offers available is slightly more limited due to your location. From installing apps to watching videos, earning money really takes very little work and your rewards can be quickly transferred to a PayPal account.


Rewardable
Rewardable has a US leaning to it, but not all of the tasks you are invited to complete are reliant on being in the US. These are described as "virtual tasks" and can be completed by anyone – so during the signup process you could simply enter a pretend zip code to get started. Rewards vary quite a lot, but are generally quite high, and your earnings can be withdrawn to PayPal easily. Should you find yourself in the States, there are in-store, location-specific tasks to carry out as well.


AppCasher
If getting paid to test out apps seems like a great way to spend your time, AppCasher will be right up your street. You can earn credits for installing and launching apps, and these credits can then be converted into gift cards that you can use to buy things from Amazon or iTunes, or you can opt to have cash transferred to your PayPal account instead. You can also refer your friends to the app, and providing they use your special code, you'll earn extra credit for each person who signs up.

Via: http://www.androidpit.com/


